You tighten the gland, you close the panel, and two weeks later there is water standing inside the enclosure. The cable gland gets blamed first, and sometimes it deserves it. But in a large share of cases the water never passed through the gland seal at all — it came down the cable, through a missing panel washer, or condensed out of the air inside a sealed box.
A cable gland leaking water is a symptom with at least six distinct causes, and the fix is completely different for each one. Replacing a correctly sized, correctly installed gland will not stop a leak that starts at the panel hole or arrives along the cable from a wet tray. This guide walks through how to isolate the real source first, then how to diagnose and fix each cause, and finally how to decide between repair and re-specifying.
Why an IP68 Gland Can Still Leak
IP68 is not a property of a gland in isolation. It is a rating for a specific tested assembly: one gland, one cable outer diameter, one thread engagement, one sealing washer, tested under defined conditions. Change any of those and you are no longer operating in the tested configuration.
That is why a genuine IP68 gland leaks on site. The gland is not counterfeit. The assembly around it has drifted away from what was tested. If you want the background on what the rating actually covers and what it does not, our explanation of what IP ratings mean for cable glands covers the test conditions in detail.
A cable entry seals in three separate places, and a leak can start at any of them.
| Sealing zone | What actually does the sealing | How it typically fails |
|---|---|---|
| Cable entry (cable side) | Sealing insert or clamping claw compressed around the cable jacket by the cap nut | Cable OD outside the gland’s clamping range, abraded or damaged jacket, missing insert, cap nut not tightened to the required compression |
| Panel interface (panel side) | Flat washer, gasket or O-ring compressed between the gland shoulder and the enclosure wall | Washer missing or pinched, wrong washer for the thread size, burred or oversized panel hole, locknut backed off under vibration |
| Thread interface | Thread engagement plus a thread seal where the standard requires it | Shallow engagement on a thin panel or short thread, cross-threading, metric and PG or NPT threads forced together |
| Cable path (not the gland) | Nothing — the gland is working | Water travelling down the cable from a wet tray, damaged jacket or top entry; condensation inside a sealed enclosure |
Notice that only one of these four zones is a gland defect. Before you buy anything, find out which zone is failing.
Step One: Confirm the Gland Is Actually the Leak Source
Diagnosing by replacement is expensive and usually inconclusive, because a new gland installed the same way will leak the same way. Isolate the source first.
- Dry and mark. Dry the enclosure interior completely, then mark the current water line with a paint pen. The height and location of the mark tells you a great deal — water at the bottom of the box points to a low entry, water on the underside of the lid points to condensation.
- Wrap test. Wrap the gland, the cable entry and about 200 mm of cable in plastic film and tape it to form a cup. Leave the enclosure in normal service through at least one full wet cycle. If water still appears inside but is trapped inside the wrap, the water is arriving along the cable or through the panel interface — not through the cable seal. If the wrap stays dry and the enclosure fills, look at the other suspects below.
- Dye test. Apply a water-soluble tracing dye around the suspect entry — the panel hole perimeter and the cable jacket where it enters the cap nut. Run a controlled water test (hose or spray, matching the real exposure direction) and then inspect inside for dye trails. Dye does not lie about the path it took.
- Segment isolation. On a gland plate with several entries, seal or tape off one entry at a time and repeat the water test. This is slower but it identifies the failing entry without ambiguity.
- Check the non-gland suspects. Door gasket, breather or drain device, conduit runs entering from above, gland plate flatness, spare holes that were never blanked, and the enclosure’s own welded seams.
Condensation is not a leak
An enclosure that is fully sealed will still collect water if it goes through temperature cycling. Warm moist air inside cools against the enclosure wall overnight, and the moisture condenses. Over weeks this accumulates into a puddle that looks exactly like a leak.
The signature is easy to recognise: water appears in dry weather, more appears after a warm day followed by a cool night, and the interior shows fine droplets on the upper surfaces rather than a trail from one entry point. The fix is not a tighter gland. It is a pressure-equalising vent or a drain device appropriate to the IP requirement — or accepting a lower IP rating for an enclosure that does not need to be sealed against immersion.
Cause 1: The Cable Is Outside the Gland’s Clamping Range
This is the most common genuine gland leak, and it is almost always a sizing problem rather than a manufacturing defect.
A sealing insert works by controlled compression. It is designed to be squeezed a specific amount around a specific range of cable diameters. Below that range, compression is too weak and water passes along the jacket. Above it, the insert deforms, splits, or prevents the cap nut from closing fully — and both of those leak.
Measure the cable properly
- Measure the actual outer diameter of the jacket at the exact point where it will sit inside the gland, not at a convenient straight section 500 mm away.
- Use a caliper, not a tape measure. The difference between a gland that seals and one that weeps can be under 1 mm.
- Take three readings 120° apart and use the largest. Cable is rarely perfectly round, and it is the largest dimension that determines whether the insert can close.
- Allow for manufacturing tolerance and for ovality. Cable OD tolerance is not zero, and the gland range has limits at both ends.
- On armoured or braided cable, measure over the layer that will sit in the gland. The OD over the armour is larger than the OD over the inner jacket.
Then choose the gland size whose clamping range brackets your measured OD with a little margin at both ends — not a gland whose range starts or ends exactly at your measurement.
A second trap: the thread size has nothing to do with the cable size. An M20 gland does not mean a 20 mm cable. M20 refers to the thread, and M20 glands are available with several different sealing inserts covering different cable ranges. Selecting on thread size alone is how people end up with a correctly threaded gland that cannot grip their cable.
If you are also choosing between body materials for a wet or corrosive location, the trade-offs between SS304 and SS316 stainless steel glands are worth understanding before you order, because material choice affects both the seal housing and how the gland behaves after years of exposure.
Cause 2: Panel-Side Sealing Failures
The gland seals the cable. Something else has to seal the gland to the enclosure, and this is where a large number of “gland leaks” actually originate.
- Missing washer. Some installers assemble the gland straight into the panel hole without the sealing washer. The gland still holds the cable perfectly and still passes a bench test. It leaks at the panel.
- Pinched or rolled washer. A burr on the panel hole edge, or a hole cut slightly off-centre, rolls the washer as the body is tightened and leaves a spiral gap.
- Wrong washer for the thread. A washer sized for a different thread will not seat on the gland shoulder.
- Oversized or oval panel hole. If the hole is larger than the washer can cover, no amount of tightening will seal it. This happens with hand-punched and field-drilled holes far more often than with CNC-punched gland plates.
- Insufficient thread engagement. On a thin panel or with a short-thread gland, too few threads engage. The joint is mechanically weak and cannot hold the washer compressed.
- Powder coat under the washer. Coating compresses and relaxes over time, so a joint that tested tight on installation can lose preload after a few thermal cycles.
- Locknut backing off. Pumps, motors, compressors, transformers and mobile equipment all vibrate. A plain locknut on a vibrating panel will loosen, and the panel-side seal loses its compression. This is a slow leak that appears months after a successful commissioning test.
Use a sealing washer matched to the thread size and the panel surface, and check the hole for burrs before assembly. Where vibration is present, use a locknut with a locking feature or a serrated washer, and re-check the joint after the first thermal cycle.
Two small components solve a disproportionate share of panel-side leaks: the sealing washer that forms the panel joint, and the locknut that holds it under load. Both are inexpensive, and both are frequently left out or substituted.
Cause 3: Tightening — Why Published Torque Charts Can Mislead You
Search for a cable gland torque chart and you will find tables giving a single number per size. Treat those numbers with caution. They are usually published for one manufacturer’s specific product, and tightening torque is not a universal constant.
The correct torque depends on the thread form and pitch, the geometry of the sealing insert, whether the body is nickel-plated brass, stainless steel or polyamide, whether a sealing washer is present, and how compressible the cable jacket is. A nylon M20 gland and a stainless steel M20 gland will not share a torque figure, and neither will two brass glands with different insert designs.
So instead of a number you cannot verify, here is a process you can actually apply.
- Get the figure from the datasheet for the exact gland you installed. If your supplier cannot give you a torque figure for a specific product, that is a meaningful signal about their engineering support.
- Use a calibrated torque wrench. Hand-tight plus “a bit more” is the single most common cause of under-compression, and under-compression is a leak. This is also the reason a leak sometimes appears only on the glands a particular installer fitted.
- Treat the two tightening points separately. The body tightening into the enclosure and the cap nut tightening onto the seal are different joints with different requirements. Tightening the cap nut does not compensate for a loose body.
- Use the witness-mark method. After tightening to the correct figure, draw a line across the cap nut and the body with a paint pen. At the next inspection, a shifted mark tells you the joint has backed off — no torque wrench needed, and no guesswork.
- Re-check after the first thermal cycle. Verify torque again after 24 hours of service or after the first heat-up. Seals take a compression set and joints settle.
- Do not over-tighten to compensate. Excessive torque splits sealing inserts, cracks polyamide bodies, permanently flattens washers and strips threads. An over-tightened gland leaks too, and it often cannot be re-used.
Cause 4: Seal Degradation and Material Mismatch
Elastomer seals have a finite service life, and the environment decides how short it is. A seal that is perfectly suited to an indoor control cabinet can fail within a year outdoors.
| Seal material | Works well with | Degrades with | Typical leak signature |
|---|---|---|---|
| NBR (nitrile) | Oils, fuels, general indoor industrial service | UV, ozone, ketones, strong acids | Hardens and surface-cracks in outdoor service, often inside the first year |
| EPDM | Water, steam, weathering, UV, ozone | Mineral oils, fuels, hydrocarbon solvents | Swells and softens where oil mist or lubricant spray is present |
| FKM (Viton type) | High temperature, oils, fuels, many chemicals | Hot water and steam, some ketones, very low temperatures | Performs well in oil service, then fails early in hot water or steam washdown |
| Silicone | Wide temperature range, low-temperature flexibility | Oils, fuels, mechanical abrasion | Tears and nicks easily where cable movement or abrasion occurs |
What a failed seal looks like
Remove the gland and inspect the insert directly. Each signature points to a different driver.
- Hardened, cracked or surface-crazed — UV, ozone or heat ageing. Common on outdoor glands fitted with a general-purpose nitrile insert.
- Swollen, soft or sticky — chemical incompatibility. The seal is absorbing something it was not specified for.
- Permanently flattened with no recovery — compression set. The seal has taken a set and no longer pushes back against the cable jacket.
- Cut, nicked or torn — mechanical damage during installation, often from pushing a cable with a sharp edge or from a burred panel hole.
- Discoloured with a chalky surface — long-term weathering.
- Missing entirely — assembly error, not a material problem.
The environment drivers to check are UV exposure, ozone from nearby motors and switchgear, chemical washdown, temperature cycling and vibration-induced abrasion. If the gland is outdoors or in a washdown area, the seal material matters as much as the IP rating — which is the same reason the material and thread specification in glands selected for outdoor panels is worth specifying deliberately rather than accepting whatever ships by default.
Cause 5: Thread and Assembly Errors
Thread problems produce leaks that look like seal failures but are actually geometry failures.
- Mixing thread standards. Metric (M), PG and NPT are not interchangeable. M20, PG13.5 and 1/2″ NPT look similar and are not. Forcing a mismatched pair cross-threads the joint and leaves a spiral leakage path that no sealant will reliably close.
- Parallel versus tapered threads. NPT is tapered and seals along the thread itself. G (BSPP) is parallel and seals on a washer or gasket face. Using a G-thread gland in an NPT hole — or the reverse — gives you a joint that cannot seal by design, however hard you tighten it.
- Cross-threading on assembly. Starting the body at an angle damages the first threads and creates a gap that widens under pressure. Thread the body in by hand for the first few turns before applying a wrench.
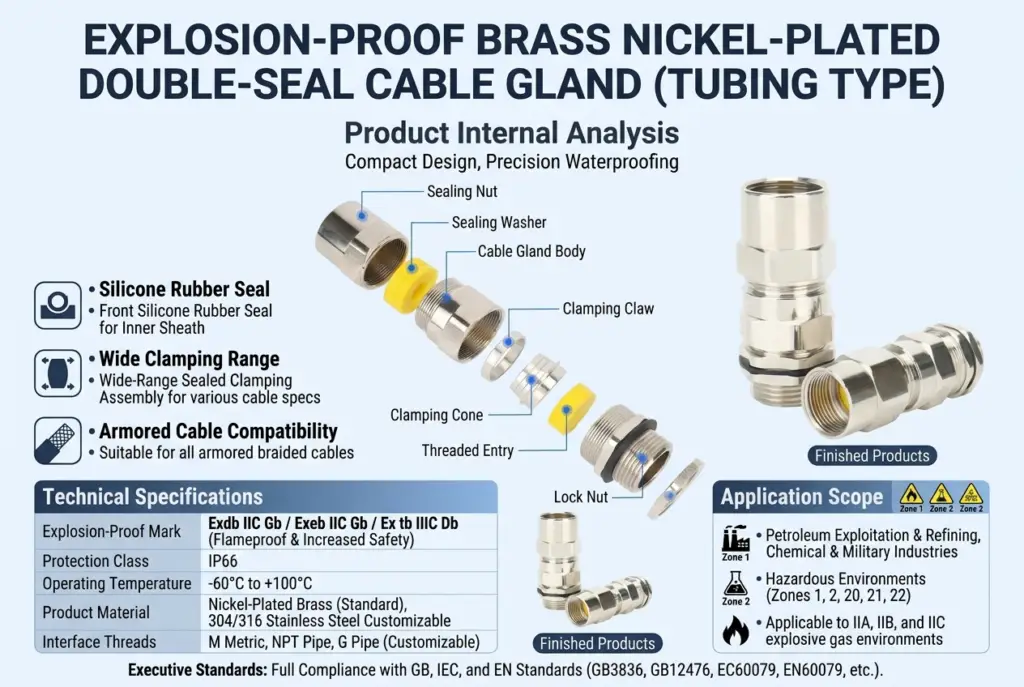
- Missing internal components. Many glands consist of a body, sealing insert, clamping claw, washer and cap nut — sometimes with an additional O-ring. A missing claw or insert is invisible from the outside, and the gland will hold the cable loosely and leak.
- Wrong assembly order. A washer fitted behind the panel instead of against the gland shoulder, or an insert reversed, produces a joint that looks correct and seals nothing.
- Sealant used as a substitute for correct selection. PTFE tape on a parallel-thread gland that is designed to seal on a washer does not fix anything, and over-wrapping can crack a polyamide body. Sealant applied around the cable jacket is worse — it hides the real fault and makes the next inspection harder.
If you are unsure which standard your enclosure port uses, the differences between metric and PG threads are worth confirming before you order, because the wrong standard cannot be corrected at installation.
Cause 6: Water That Never Touched the Gland
Some leaks are delivered to the gland by the cable itself.
- Water running down the cable. A cable routed through a wet tray, a roof-level run, or a damaged jacket upstream will carry water down to the enclosure. The gland seals against the jacket outer surface, but water travelling along the sheath or inside the cable structure arrives at the entry point and finds a path.
- Top entry without a drip loop. Entering an enclosure from above is the worst orientation. If it is unavoidable, form a drip loop below the entry so water sheds before it reaches the gland.
- Conduit drainage. Water collecting in a conduit run drains downhill and discharges into the enclosure. Conduit systems need drainage at a low point, not a sealed gland at the bottom.
- Spray direction. Washdown and sprinkler spray aimed at the enclosure from below defeats many sealing arrangements that were tested against falling water.
- Condensation, as covered earlier — the water was already inside as vapour.
These cases share a signature: the gland and the cable seal are intact, the water trail leads away from the entry point, and the leak correlates with rain or washdown rather than with the gland installation date.
Repair or Replace? A Decision Matrix
| Situation | Recommended action |
|---|---|
| New installation, leaks on the first water test | Correctable installation fault. Re-check cable OD against the gland range, washer presence, thread engagement and torque before replacing anything |
| Leaks after years of service; insert hardened, cracked or flattened | Replace the sealing insert if it is available as a spare part; otherwise replace the gland |
| Body corroded, or threads damaged or cross-threaded | Replace the gland. A damaged thread cannot be sealed reliably in the field |
| Leaks only during heavy rain or washdown | Panel-side sealing. Check the washer, the panel hole condition and locknut tightness first |
| Water appears in dry weather, or after warm days and cool nights | Condensation, not a gland fault. Review venting and drainage |
| Repeated leaks despite correct size, correct assembly and correct torque | Re-specify. The gland type does not match the environment — material, IP level or thread engagement is wrong for the duty |
| Hazardous area installation | Replace like-for-like with an equivalent certified gland. Field modification or substitution of parts can invalidate the certification and the area classification |
Re-Specification Checklist
If the decision is to replace rather than repair, work through these points in order. Most repeat leaks come from one of them being skipped.
- Measured cable outer diameter at the gland position — the largest of three readings, not the nominal size
- Cable construction: armoured, braided or plain, and the jacket material
- Thread standard and size required by the enclosure port, confirmed rather than assumed
- Available thread length against panel thickness, so engagement is sufficient
- Panel hole diameter and condition — deburred, round and within the washer’s coverage
- Required IP level, and whether the enclosure is vented or drained
- Hazardous area classification and the certification the gland must hold, if applicable
- Body material chosen for the corrosion and UV exposure: nickel-plated brass, SS304, SS316 or polyamide
- Seal material chosen for the chemicals, temperature range and UV exposure present
- Washer and locknut type appropriate to the panel surface and vibration level
- Torque figure from the supplier’s datasheet for the specific product
Where the duty is genuinely wet — outdoor panels, washdown areas, coastal or marine exposure — it is worth starting from a gland range designed for that service rather than adapting a standard type. The waterproof cable gland range covers IP68-rated brass, stainless steel and polyamide types across metric, PG and NPT threads, which lets you match thread, cable range and material to the actual installation instead of compromising on one of them.
Preventing the Next Leak
Nearly every cause in this guide traces back to one of a small number of assembly habits. The most common installation faults that end in water ingress — and how to avoid each one — are covered in our guide to cable gland installation mistakes that cause IP68 water ingress.
- Specify by measured OD and confirmed thread, not by the assumption that a thread size implies a cable size.
- Request a torque figure with the quotation and apply it with a calibrated wrench.
- Witness-mark every gland and re-check after the first thermal cycle.
- Match seal material to the environment — UV, chemicals, oil mist and temperature range all matter more than the IP number on the box.
- Install drip loops on top entries and provide drainage or venting where an enclosure is sealed but temperature-cycled.
- Deburr panel holes and fit the washer every time. This is the cheapest leak prevention available.
- Inspect on a schedule. Look for shifted witness marks, hardened or cracked seals, thread corrosion and water staining. Catching a hardened insert before it leaks costs a fraction of a shutdown.
- Keep spare inserts, washers and locknuts in stock. The parts that fail are the cheapest parts on the assembly, and waiting for them is what turns a seal replacement into a production interruption.
Frequently Asked Questions
Why is my IP68 cable gland leaking water?
Because IP68 applies to a tested assembly, not to the gland alone. The rating assumes a specific cable outer diameter, thread engagement and sealing washer. If the cable OD sits outside the gland’s clamping range, the washer is missing or pinched, or the thread engagement is too short, the tested configuration no longer exists and water can pass even though the gland itself is sound.
How tight should a cable gland be?
Use the torque figure published for the specific gland you installed, applied with a calibrated torque wrench. There is no universal number — torque depends on thread form, insert design, body material and washer type, so a chart for one manufacturer’s product does not transfer to another. Tighten the body and the cap nut as separate joints, and verify with a witness mark after the first thermal cycle. Under-tightening is more common than over-tightening, but both cause leaks.
Can I fix a leaking cable gland without replacing it?
Often yes. If the gland is new, the cause is usually installation: cable OD outside the range, a missing or pinched washer, insufficient thread engagement or incorrect torque. If the gland has been in service for years and the insert is hardened, cracked or permanently flattened, replacing the insert restores the seal where spares are available. If the body or threads are corroded or damaged, replace the whole gland.
Should I use PTFE tape or sealant on the cable gland thread?
It depends on the thread standard, and it is not a fix for a sizing or assembly problem. Tapered NPT threads seal along the thread, so a thread sealant has a legitimate role. Parallel G threads and metric threads seal on a washer or gasket face, so tape does not help and can crack a polyamide body if over-applied. Sealant around the cable jacket is a false fix that hides the real fault and complicates the next inspection.
Why does water come out of the cable when I loosen the gland?
That water was already inside the cable or travelling along it. It reached the enclosure by running down the cable from a wet tray, a damaged jacket or an entry point above, and the gland has been holding it back rather than letting it through. The fix is upstream: form a drip loop, correct the cable routing, or repair the jacket. A tighter gland will not solve it.
Which seal material is best for an outdoor cable gland?
For UV, ozone and weathering, EPDM is usually the right starting point. Choose FKM where oils, fuels or aggressive chemicals are present, and silicone where a very wide temperature range or low-temperature flexibility is needed. Nitrile performs well indoors and in oil service but hardens and cracks outdoors, so it is a poor choice for glands exposed to direct sunlight.
How do I know if the leak is the gland or the enclosure?
Wrap the gland and the first 200 mm of cable in plastic film and leave the enclosure in service through a wet cycle. If water collects inside the wrap, it is arriving along the cable or through the panel interface. If the wrap stays dry and the enclosure still fills, the fault is elsewhere — a door gasket, a conduit entry, a spare hole or condensation. A tracing dye applied at the suspect entry point will confirm the path.
The Bottom Line
A cable gland leaking water is rarely a single-component failure. Work through it in order: confirm the leak source before buying anything, then check cable diameter against the gland’s range, then the panel-side washer and locknut, then thread engagement and torque, then seal condition and material compatibility. In most installations the fault turns out to be a missing washer, an undersized cable or an under-tightened cap nut — not a defective gland.
When the decision is to replace, specify from the measured cable diameter and the confirmed thread standard, choose the body and seal materials for the actual environment, and ask for a torque figure with the quotation. If you are working on an outdoor, washdown or marine installation and want to confirm the right thread, cable range and material combination before ordering, send us your cable OD, thread standard and exposure conditions and we will recommend the matching configuration.